Windows 10 is Microsoft’s most advanced version of the PC Operating System. It’s an ideal choice for professional gamers as the system can easily load up all types of games and offer a super smooth gaming environment. However, PC gaming is way more different than Console gaming and for that reason, you need to optimize your Windows 10 system well. Today’s guide is all about how to make games run faster on Windows 10.
How to Make Games Run Faster on Windows 10 Methods
If you get bored with the poor gaming performance on your system, then the following methods will help you to improve your overall gaming performance.
Method 1: Enable Game Mode on Windows 10
Windows 10 comes with a built-in Gaming Mode to improve your gaming performance. To do so, you need to first check whether the Gaming Mode on the system is enabled. If not, do it right now!
Step 1:
Open the Settings menu by pressing Windows Key and I Key simultaneously.
Step 2:
From the left sidebar, click the Gaming option.
Step 3:
Select the Game Mode option and click the Toggle button if it is disabled. By clicking on to the toggle button, the Game Mode will be enabled.

Method 2: Update Graphics Drivers
Outdated Graphics Drivers may also reduce the overall gaming performance of your system. To do so, you need to check for the update of your GPU drivers. The following steps will show you how you can update your system’s GPU drivers.
Step 1:
Open the Run box by pressing the Windows Key and R Key simultaneously.
Step 2:
Type in msc in the box and hit the Enter button. This will open up the Device Manager page on your computer’s screen.
Step 3:
From here, search for the Display Adapter option and expand it by clicking on to the + button.
Step 4:
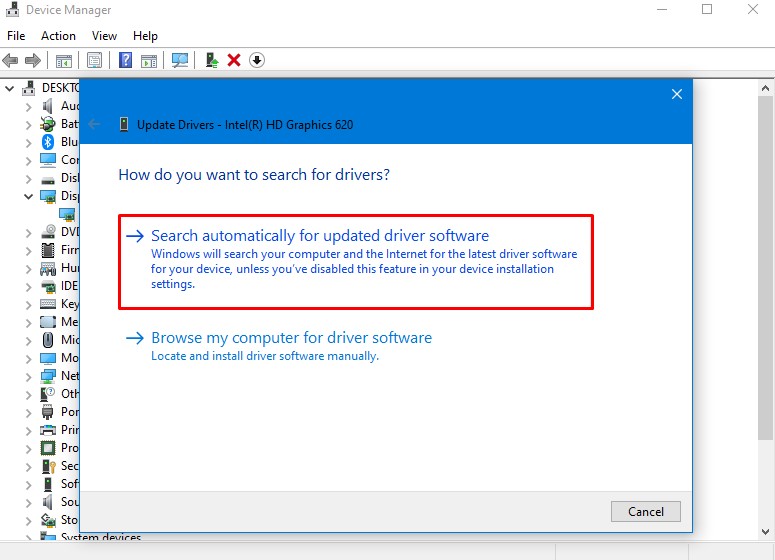
Select the Graphics Driver by right-clicking on to it and click the Update Driver option from there.

Step 5:
Select “Search automatically for updated driver software” option. The system will search for the new drivers automatically. Follow the on-screen instruction to update the drivers of your system.
Method 3: Limit Mouse Acceleration
By disabling the Mouse Acceleration option, you can see an improved speed of your system. Eventually, it improves your gaming performance on the respective PC system.
Step 1:
Open the Settings menu by pressing Windows Key and I Key together.
Step 2:
From the pop-up window, select Devices option.
Step 3:
Select Mouse Tab from here. Click the Additional Mouse Settings option.
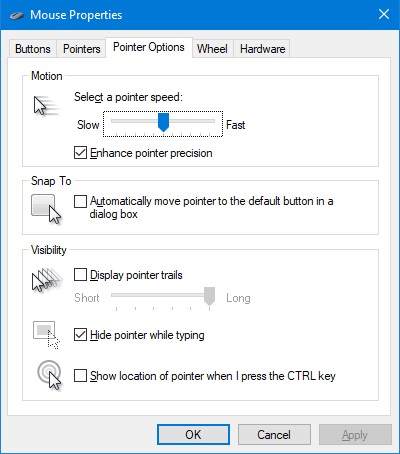
Step 4:
Select Pointer Option from here, you need to disable the Mouse Acceleration of your system.
Method 4: Disable Notifications Option
Windows 10 lets you set up the notifications of your system. The built-in Focus assist feature allows you to decide how you will receive notifications and how you can organize it. Notification pop-ups might affect your gaming performance and for that reason, you need to disable it to optimize your system for gaming.
Step 1:
Open the Settings menu by pressing the Windows Key and I Key simultaneously.
Step 2:
From the Settings menu, click System option and then select the Focus assist option.
Step 3:
You will see three different options to manage the notifications from which you need to select the Alarm Only option.

Once done, close down the current window to make changes. By selecting this option, you will not see any pop-up message of notification on your screen. Gaming performance will not be interrupted.
Method 5: Disable Automatic Updates of Windows 10 System
Windows 10 updates automatically when a new update arrives. The system not just update its OS but also updates the files, applications and software automatically when you connect it to the Wireless Network. You don’t need to manually search for the new update with this Automatic Update option enabled.
However, it affects the overall PC performance and hence the gaming performance as well. You have to disable the Automatic Updates option to turn off the system from downloading and installing the latest updates automatically.
Step 1:
Open the Settings menu by pressing the Windows Key and I Key simultaneously.
Step 2:
From the Left Sidebar, click the Update and Security option and then click the Windows Update option.
Step 3:
In the Windows Update section, you will see Advanced options there.

Step 4:
You will see the Update option there. From here, select the Pause Updates option from here to stop the system from updating the apps and OS automatically.
@makeuseof.com
By pausing the automatic updates, your system will not download or install the new updates during the gaming hour. Your system will run smoothly and it offers the best of gaming performance.
Method 6: Make Use of DirectX Diagnostic Tool
DirectX Diagnostic Tool is a powerful tool designed for Windows Operating Systems to optimize your PC performance. The same tool helps gamers to play different types of PC games smoothly.
The tool supports GPU and CPU cores, lowered power consumption, enhanced graphics and optimizing the overall PC performance. You can get this tool installed and configure it for your system to get the best of performance.
Step 1:
Open Windows PowerShell from the Startup Menu.
Step 2:
Now, you have to enter the following command in the PowerShell’s screen.
dxdiag
Step 3:
Tap the Enter button.
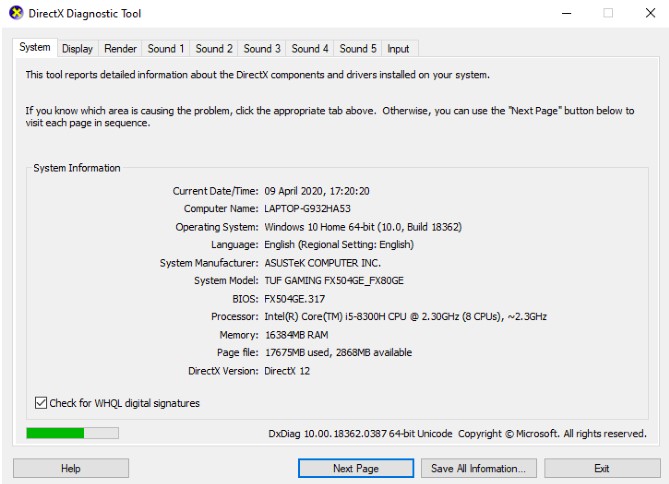
Credit@makeuseof.com
You will see the DirectX Diagnostic Tool on your system. Follow the on-screen instructions to let the tool works for you to optimize the PC performance. The best part about this Diagnostic tool is it optimizes your Windows 10 system for many gaming settings which you cannot do manually. It’s an essential tool to check before you start playing any type of game.
The Bottom Line:
As noted above, Windows 10 is a highly recommended Operating System for professional gamers. Over 80% of the PC gamers are using Windows 10 versions on their systems to run the premium-end games on their respective systems.
To make games run faster on Windows 10, we have provided the most effective and simplest solutions in the above article. Follow these methods one by one to optimize your system for gaming. Boost your gaming performance now!